Compsoft Flexible Specialists

Compsoft plc

Compsoft Weblog Compsoft Website News Archive Privacy Policy Contact Us  

Friday, June 26, 2009

Winning with Microformats and JQuery

Microformats are a nice way to get semantic data onto a page, and here at Compsoft we have had a maptacular week which has given us the chance to use some with a little JQuery to make things nice.

So on a map we are plotting locations. We are also listing these locations next to the map. You can drag and drop a selection of locations from the main list, into a short list. You can then get Google maps to create us a route based on this short list.

But the cool thing is, you can drag items in the short list to rearrange the route!


How though, do you know the order of the items in the short list once they have been reordered?

With the magic of JQuery and microformats of course!

The markup used to present also defines the data that is being displayed. CSS styling then allows us to make it look nice. This is what the markup looks like:
<div id="location628" class="location">
    <div class="name">Geodis UK Limited</div>
    <div class="address">Warren Farm Transfer Station</div>
    <div class="detail">1 mile</div>
    <div class="latlng">(50.8915618, -1.1965132)</div>
</div>

We can make the lists sortable and allow drag and drop between them with JQuery like this:

$(document).ready(function() {
    $("#locations").sortable({ connectWith: "#selectedLocations" });
    $("#selectedLocations").sortable({ connectWith: "#locations" });
});
and listen for the sorting to finish with this:
$("#selectedLocations").bind('sortupdate', function(event, ui) {
    getRoute();
});
And because we are using JQuery, and microformatting makes it clear what the data means, we can use a JQuery selector to get the data stored on the page in the order they are displayed! This makes it so simple to grab the ordered data.

function
getRoutes() {
    var waypoints = [];
    var stops = $("#selectedLocations .latlng");
    for (var i = 0; i < stops.length; i++) {
        if (divs[i])
            waypoints.push(stops[i].innerHTML);
    }
    //GDirections object connected to GMap on page to display the route
    directions.loadFromWaypoints(waypoints);
}

Labels: , ,

Monday, June 15, 2009

Animated gifs stop animating in IE

An annoying bug/ feature of Internet Explorer is that animated gifs stop animating the moment you click a link to navigate to another page. Other things can stop them animating too: I recently found that a flash-based file uploader that we use triggers this bug when it finishes the upload.

Fortunately it's not to hard to work around. If you reassign the value of the src attribute of the <img> tag, the animation starts again.

jQuery makes it easy to reassign all such tags in one fell swoop:

//codesnippet:7660712A-6D8A-4820-A99F-751F44A57AD2
function fixAnimatedGifsDamnYouInternetExplorer()
{
    $("img").each(function()
    {
        this.src = this.src;
    });
}

In my case, I called this function when my upload completed, but you could easily attach it to the click event of every link on your page.

Monday, June 08, 2009

Microsoft release SEO Tools

SEO (search engine optimisation) is debatably one of the most important things to get right in a website that needs web traffic. If your web traffic is driven by search engines, you want to give the search engines anything and everything they could need to connect someone's query with your site. Especially as traffic from search is effectively free traffic.

Google have webmaster tools available which give you access to stats about your site (assuming you have tracking on your site), crawling errors etc. They have associated help sections and even have an SEO guide available for download.

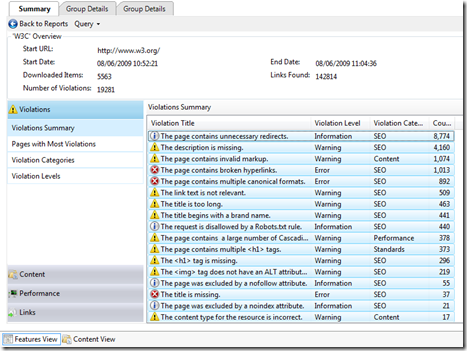
What Microsoft have released is an IIS add in that gives you a huge amount of stats, finds issues and provides diagnostic information about any site you point it at. We pointed it at the W3C (World Wide Web Consortium - Home of Web Standards), limited the tool to 5000 links and set it running.

It found more than 19,000 violations:

w3c

It ranks these by SEO, Content, Performance and Standards and gives an indication of the severity.

The thing you notice when you get going with the tool is the extent to which you can drill down and the immense utility of the information it exposes.

Did you know the content of the <title> tag shouldn't exceed 65 characters? search engines generally truncate the text after that.

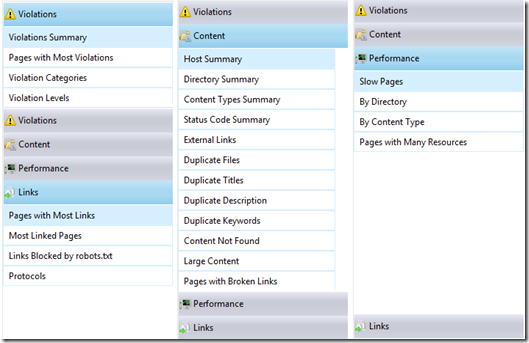
Here's a hastily thrown together image of the other menu options:

menuoptions

It's currently in beta and only works in IIS 7 so that means it's limited to Windows Vista and Windows Server 2008. I think it'll quickly become a mainstay of the SEO optimiser's arsenal. Find out more here: Scott Guthries blog

Monday, June 01, 2009

Speeding up deployment by zipping drop files in TFS

As most of the projects we produce are web based, we use the file copy feature of ASP.NET heavily. It makes for wonderfully simple deployment. Using this feature does however mean that we zip the files up before sending them over to the live server.

To speed up deployment even further, we added a zip command to our build job in Team Foundation Server Build that zips the files in the drop location, ready for copy.

Zipping is not supported out of the box in TFS but the MSBuild Community Tasks Project has a lovely one.

To use the zip command in the community tasks library you need to add a reference to it.

<Import Project="$(MSBuildExtensionsPath)\MSBuildCommunityTasks\MSBuild.Community.Tasks.Targets"/>


Once this has been imported you can then use the zip command in your script. We tend to use the zip command in the AfterDropBuild event.


<CreateItem Include="$(DropLocation)\$(BuildNumber)\Release\**\*.*" Exclude="$(DropLocation)\$(BuildNumber)\Release\**\*.config">
<Output ItemName="ZipFiles" TaskParameter="Include" />
</CreateItem>

<Time Format="yyyy-MM-dd">
<Output TaskParameter="FormattedTime" PropertyName="buildDate" />
</Time>

<Zip Files="@(ZipFiles)" WorkingDirectory="$(DropLocation)\$(BuildNumber)\Release" ZipFileName="$(DropLocation)\$(BuildNumber)\NBR Release $(buildDate).zip" />


We also tend to put the date into the release and we do that by using the Time command. This now gives us a prepped zip file with all the release files in it.